
It’s finally here! Multiple Select Custom Lists has been deployed, and we can’t wait for you to experience it!
To recap, we published this article a couple of weeks back to give our users the opportunity to review the existing configuration to identify where multiple custom list selection will benefit users.
As promised, this highly anticipated feature will revolutionise the way you interact with your custom lists. No longer bound by the constraints of single-item selection, you will be able to effortlessly choose multiple items from a single custom list in one go.
Use Cases to consider fixing:
Until now, multiple selection was achieved by:
- Configuring various Yes / No fields to allow capturing multiple skills for a resource.
- In some cases, an existing custom list would contain a value for “All” or “Multiple” to indicate that all or multiple business units are impacted.
- In extreme cases, multiple fields have been configured using the same custom list, e.g. Business Unit, Business Unit 2 or Business Unit 3 for a scenario where the requirement is to show that there is more than one business unit involved in a project.
Now it’s time to clean up and get better value using the Multiple Select Custom List!
What happens to the standard custom list?
The existing custom list data field will continue to be available and continues to be useful for data that has a one-to-one relationship, e.g. statuses for work items where a work item can only be in a single status (New, To Do, Doing, Done) or project phases where a project follows the project process (Initiating, Planning, Executing, Closing). We’ve just renamed the standard custom list to “Custom List (Single)”.
How to switch a single custom list to a multiple select custom list
Switching from a single custom list to a multiple select custom list is useful in scenarios such as selecting multiple strategic objectives that a project is supporting, or where a project impacts various business units.
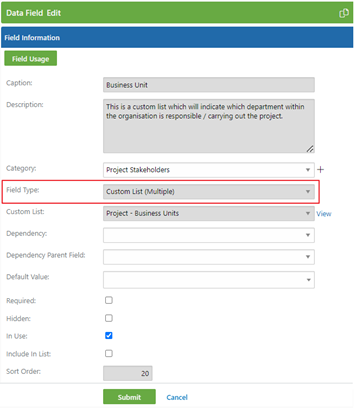
For the PPO Administrators this can be achieved under Administration by selecting Data Fields. Select the specific field where you want to change from Single to Multiple, then select Custom List (Multiple).
Ensure that once you have switched to the Multiple Select Custom List, that you remove the old values like “All” or “Multiple” so that users can’t use it going forward. This can be done by retiring those custom list items.
Impacts on switching from single to multiple
Where existing custom list fields are converted to a multiple custom list data field using the same custom list, we will maintain the existing data and maintain the history when you switch the field type.
How to go about adding a new field to replace Yes/No selections
In cases where multiple Yes/No fields have been configured you can simply add a new field using the Custom List (Multiple) field type. Once the new multiple select field has been add and values updated, the Yes/No fields can be retired.
To support PMOs where there are multiple custom list fields or checkboxes, the PPO Support Team can assist with the bulk editing of existing data, just reach out to us and we’ll get going.
Reporting
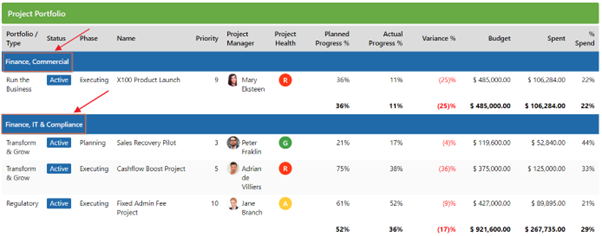
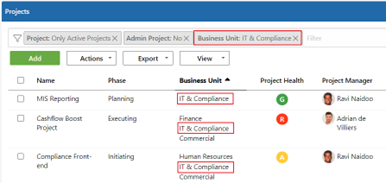
When running a report or dashboard and applying a Group By parameter using a multiple select field type, the Group By will group in exactly all the different variations of how the data has been captured.
Filtering stays as seamless as always
In the Filter Control, you can filter and select 1 value and all records that contain that value will be included.
There is no change in how to build standard pop up filters. If you build a filter on a filter popup, the multiple select is not available.
Watch the video to see the multiple select custom list feature in action!
Join Tarryn-Leigh Frans & Guy Jelley for our 40-minute live product webinar, followed by a 20-min Q&A. You’ll get a first-hand look to see how our users have simplified ways of work and improved user’s experience by adopting these awesome new features. We’ll cover:
- Where you can now use Multiple Select Custom Lists, and the process to switch from your current custom list.
- How to colour code your custom list values and retire unused values.
- How to save time and recreate home page dashboard views with the new Copy Home Page feature.
- Last but not least, a new interactive Heatmap, which introduces some subtle improvements to your Resource Planning reporting.
Click HERE to register for our live Product Webinar on 12 June 2024!
We do our very best to make PPO better every day, so we’d love to hear your feedback on these latest enhancements.
Don’t forget to let us know if you have any other product enhancement ideas! Drop us an email or log an idea on our community portal please. More importantly, keep up to date with all our new product information by subscribing to our blog.